1/18/2013

Storage Shelf for the Basement

A few months ago i built a wood shelf in the garage.  It turned out so well that i decided to build one in the basement as well.  Here's how the garage shelf turned out.
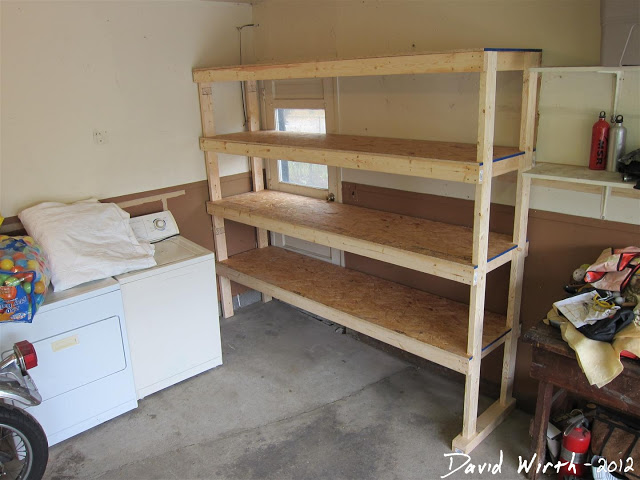
how to make build a garage shelf, wood 2x4 shelf, easy simple

To keep it simple i decided to build it exactly the same as before, no need to reinvent the wheel.  So i went upstairs to find my old set of plans i drew on Google SketchUp. 
wood shelf plans, dimensions, how to make, build, easy, simple, diy

 And here's the Google Sketch up files i used.
So i was using the same plans, the same wood, at the same price, the same tools and the left-over screws from the last time.  The ONLY difference is that i wouldn't be able to make the shelf as tall.  Out in the garage a 7 foot high shelf was fine, but in my basement that wouldn't work.  The location i was thinking of putting the shelf would only allow for the top shelf to be 6 feet high.  That also meant that i had to shorten the gap between each shelf.  But this time i got to build it in the comfort of the basement.

Material List:
Description     Height     Width     Length     Quantity    Price         Total
2x4                 2"            4"          8ft           15         $2.50        $37.50
OSB               1/2"          4ft         8ft            2          $13.00      $26.00

    Here's what one half of the basement looked like before i started.  It's mostly PVC and metal pipe, then long pieces and scraps of wood.  The new shelf would go right behind the three plastic shelves.  You can see the metal heating duct attached to the ceiling, the reason why i had to lower the measurements.
    basement hoarders, junk, woodshop in basement, work, shelf

    This is the wood i bought, same as before.
    wood needed for shelf, to build, how to, make, cost, price

    Then the first thing i did was to remake the cardboard templates.  Because of course i immediately threw out the old ones after building the garage shelf, thinking i'll never need these again.
    cardboard templates for wood shelf, screw location, cut out

    This is what it looks like just after i started working.  I cut 4 of the 2x4's to the 6 foot height i needed and was just beginning to attach the side supports.
    working in the basement, build shelving for totes, storage, clean

    You can see the four 2x4 side supports in the middle.  To try and keep it all square i would measure and mark the heights on the vertical boards.
    storage totes, shelf, how to build, make, plans, wood

    Again this is after i attached the bottom shelf, then had to force in the middle two OSB boards.  I had to do it in that order because otherwise they wouldn't have fit.
    making a wood shelf, easy, plans, instructions, directions, how to

    This is the shelf laying on it's side.  The process is, i attach the three 2x4's for the two middle shelves and the top.  Then i flip it over and do the other side.  You might notice the long 2x4 sticking out of the side near the top.  That's one big tip i learned from the first time.  It's a 10 foot board that i use to pick the shelf up and flip it over.  It works great when you are by yourself trying to maneuver an 8 foot long wobbly shelf.
    2x4 shelf design, how to build, strongest joint, screw, deck screws

    Here's the shelf all done and pushed into place.  It's the perfect size for the basement and you'll also notice that the plastic shelves align at the same height.
    basement shelf, storage, organize, how to make, wood shelf, build, plans

    This is the view from the side.  Obviously i built it with the same corner joints as before.  John and i drew them up and felt that they were the strongest way to connect the boards.
    easy wood shelf design, plans, build, 2x4, cheap, cost, money, strong


    It's amazing how fast the shelf filled up.  I put the long flat boards on top, scrap wood on the second, miscellaneous stuff on the third, pipe on the bottom shelf and all the boxes on the floor below.
    organize your my basement with shelf, how to make, easy, build tools


    This is what the basement looks like now.  A lot cleaner and organized with room to walk.  Before the one side of the basement looked like a scene from hoarders.
    clean basement after building shelf, storage, organize

    The best part of the whole thing is that the shelf i built in the garage took about 3 days to make, while this time i built the entire thing on a Monday night after getting home from work.  All together it took just 4 hours.  And that included me loading the shelf up with all the junk.

    EDIT:   UPDATE VIDEO
    Here's a summary video of the storage shelf being built

    1/16/2013

    Adsense Account Re-Enabled from Temporary Ban

    You might have noticed that for the past few months i didn't have ads on my site.  And unless you have Ad-Block-Plus installed, you will now see that i do have ads.  

    Trying to earn money from people clicking on ads has been a long process.  It started as a neat little thing that made me a few pennies, then it turned into hours of spinning articles and posting 1,000 pictures to Pinterest.

    I used Google Adsense to host/supply the ads which were shown and for several months it was going great.  I went from making nothing to averaging $1 per day.  Then right after i got my first check from Google for $125 i got banned for " link schemes."  Actually the email said lots of things like "check our terms of service" and i really wasn't sure what i had gotten in trouble for.  Luckily in the email they said i was only temporarily banned from Adsense and if i fixed the problem i could have my account re-enabled.  Had i been clicking on my own ads it would have been an immediate and permanent ban.

    Also in the email it said i could write an appeal, so i did.  It was denied.  So i wrote 5 more over the next 5 months.  Each letter i wrote in a different tone.  The first time i wrote about i am clueless i was and  didn't know how this happened.  Another time i tried admitting to everything, even stuff i didn't do.  Each response i got was the same, a cut-and-paste paragraph saying to look at their terms of service.  But always at the end of the letter it said i could continue to appeal if i felt that i had fixed the problem.  Although the more i read about trying to get Google to reverse their account ban, the more unlikely it seemed.

    So i decided to try a few "Adsense alternatives."  I though "forget them, Google Adsense isn't the only player in the game"  So i tried Chitika, Clicksor, Bidvertise and a few more.  Some sites like AdBrite only worked with a private domain, which meant that i could not put their ads on Blogger.  I do have notitlerequired.com but davewirth.blogspot.com is where i have all the traffic and earnings.

    What i learned after trying all of those different companies is that they can't match Adsense, at least in my situation.  Chitika and Clicksor payed me at most 15¢ per day.  Sometimes i would get 4 or 5 clicks on an ad and still i would only get a few cents.  So after trying all the other ad providers i decided to give up.  I'd rather have no ads on the site, then obnoxious ones that only give me pennies per day.

    but then....

    A few weeks ago i looked into Google Webmaster Tools and checked my backlinks.   The whole time i knew about the "suspicious backlinks" that Google was talking about.  I just assumed there was no way of removing them.  Somehow i had over 15,000 backlinks from one site and 3,000 from another.  There were some others but those were the two oddballs.  So i emailed the people running those sites and asked them to try and remove any links pointing to my page.  Amazingly a couple of days later the 15,000 links pointing to my site disappeared.

    I decided that i might as well write another email to Google, saying that i got rid of some of the "bad links" and that's the best i could do.  Two days later i got a response saying that Adsense has been re-enabled for my site.  I was really surprise and quite happy.

    It's funny how in the past 5 months my emotions had changed about the whole situation.  First i was a little mad at myself for getting banned, then i was determined to get Adsense reactivated, then i was mad at Google for blocking me, then i was inspired to try a different company, then bummed out when noting worked.  By the time they finally reinstated my Adsense account i had sort of forgotten about it.  The big let-down when i got banned, was that i was always hoping that Adsense would be something where i could just sit back, do nothing, and make $1 a day.  Luckily that hope has returned.

    So this time i'm going to keep things real simple.  And one big advantage i have now that i didn't have a year ago is Data.  I can learn from from my past attempt.

    Using a combination of Google Webmaster Tools, Google Analytics, and Google Adsense i can look at past information and see what worked, what didn't, why something worked and where did the money actual come from.  First i looked at my past earnings.  This chart shows how i went from nothing to averaging around $1 per day, then back to nothing.  The small spikes after October are from my videos on Youtube.  I have Adsense linked to those 100 videos, thought it gives me practically nothing, maybe $3 a month.  But my hope is that the daily earnings jumps back to what it was before being banned.
    adsense earnings, what earns the most, popular ads, keywords

    Next i looked at the different type of ads i used before.  At the top you can see the 7 rectangles, i only have two active in this picture, Earnings and Clicks.  I also looked closely at CPC (Cost Per Click) but for clarity i have it turned it off.  
    google adsense ad size earnings chart, text, image, video, rectangle size, location

    For the new ad layout decided to put just 2 ads on the blog, 300x250 which goes in the top right corner and 728x90 at the top middle.  Both of them i set to ONLY show images/video/rich media, not text.  From looking at the past data i see that text does result in higher clicks but lower CPC, which means that even though more people click on the text ads i'm not making as much per click.  So forcing Adsense to just show images it will hopefully mean that i will be getting clicks equal to $1 instead of 2¢.  

     Looking at the chart above you might also be thinking, what about the 200x90 button, why don't you use that instead of the 728x90.  The reason that ad worked so well was because i imbedded it into the body of the blog post.  I'm not sure if it's technically allowed, so to be on the safe side i'm leaving it off.

    Here's my earnings broken up by country.  It makes sense that the United States is at the top, then the UK and Canada.  They are all english speaking countries and probably relate most to the things i write about.
    adsense by country, earnings, CPC, CTR


    This is an image that looks familiar to ones i've posted in the past.  It show what people are typing into Google Search that leads them to my blog.  You do have to remember that this is a combination of Google Search, Google Image Search, etc. and i get lots of page views through Google Images.  This is really important information to understand about your site's traffic. 
    adsense earnings, page impressions, SEO, Query, clicks, CTR

    Looking at this data you can see that i get 1,000 clicks per month from people typing in "project free tv" and "free tv links".  Actually 6 out of the top 7 all go to just one of my blog pages.  You can test this out by going to Google and typing in "free tv links" and see what pages come up, hopefully mine is 5th from the top.  Or try typing in "skype vs tango" my link should be the first one.  You'll also notice that i have my Google+ profile picture linked, which i do think draws people's attention to my links as well.


    It's no coincidence that the page with the top 6 searched for keywords is also the page which i earn the most from Adsense.
    top earning pages from adsense, how to, revenue,

    I definitely wrote the blog post, Watch Free TV Online, with popularity and keywords in mind.  The other great thing about that page is that it works perfectly with Adsense.  It usually puts a Netflix ad at the top and a Hulu ad in the corner.  Both ads are totally relevant to the page and that's why lots of people click on them.

    For now i'm just going to put the ads back to how they were before and hope for the best.  Maybe i'll check the data here and there but i really like the idea of making money by doing absolutely nothing.

    1/14/2013

    DIY - Homemade Photo Booth - For Wedding (Part 1)

    I was talking with some friends at bowling the other day about weddings.  They said that one of the best things they had at their reception was a photo booth.  I thought it sounded like a great idea, so i looked into it.  I checked online and there were a lot of places that rent photo booths, but they charged hundreds of dollars per hour.  That's when i saw that some people had made their own photo booth and i though that would be even better.

    Now when most people think of a photo booth they think of a small square box that only two people can squeeze into. 
    photo booth, pay, make, mall, stool, price, location

    The photo booth that i planned on making would be much larger and allow for multiple people to be in at once. 

    So i read everything i could about making your own photo booth.  My original plan was to just have a camera on a tripod, pointing at a black background.  After a few weeks that somehow turned into me building a fully enclosed frame with curtains, lights, monitor, a printer, power cords and a custom button.  Here's my last couple of drawings, just before i started building everything. 
    plans, diagram, measurements, photo booth, diy, how to make

    I decided that the best material to use for the frame would be PVC pipe.  The size i choose on using was 3/4", i picked that for a few reasons:
    • Cost - a 10ft piece only cost $2.20 and the brackets are around 50 cents each
    • Weight - if had i used 1" PVC it would have been way too heavy and too hard to carry around
    • Strength - this was my major concern, that 3/4" might not be strong enough and one of the pipes will snap
    But i figured that 80% of the frame will only have to support lightweight curtains.  The part i was worried about would be the front which had to support the laptop, monitor, printer, camera, button, lights and cords.  I wouldn't really know until i put all the equipment on the frame, whether it would be strong enough.

    Another problem i ran into was what camera and software to use.  I assumed that i could use my Canon S95 camera.  It is a really good point-and-shoot  that takes great pictures.  I have CHDK installed on it and figured that there was some script that i could use.  However in the end it turned out that that camera wouldn't work.  The reason is in the software/program i decided on.

    There are a few photo booth programs that are available online and i found two major differences between them.  The cheaper more basic programs use a webcam.  When the person presses Start, the program basically takes a "screen shot" from the video feed of the webcam.  Programs named SparkBooth, SeeMonkey, and Windows Photo Booth 7 all use this method of webcam screen shot.  SparkBooth is definitely the best of these versions, with a great user interface and set of options, which are easy to understand.

    But the problem with taking a screen shot from a webcam video is poor quality.  The camera's themselves are only like 1.3 Mp, which is fine for what they typically do, stream live video.  And for lots of people this type of software would be fine.  But i felt that if i am going through all this effort i didn't want to have poor quality images. 

    So the other type of software available is more of a professional version.  It allows you to use a real camera and thus gives you far better photos.  This was definitely the way i wanted to go.  The software i used was PSRemote from a company called Breeze Systems.  They actually make a few different programs, NKRemote and DSLRRemote which are intended for people with a digital SLR camera. There's also another program called PhotoBoof, but that software is insanely expensive.

    And that brings us to another bummer in making a photo booth, purchasing the software.  None of them are cheap.  Well the Windows Photo Booth 7 is free and a couple of them are under $20, but those programs are terrible.   But on the flip side, PhotoBoof is a professional program for people who intend to set up their own companies i think.  The software license for PhotoBoof is $600.  SparkBooth is $60 for the consumer and $120 for a company and PSRemote starts at $95 and goes up from there.  Luckily using torrents i ended up finding a full version of PSRemote for free.

    So great, i have a good design and the software i wanted...that's when i found out that my Canon S95 wouldn't work.  In order for the camera to take a picture it needed to have a "remote parameters" function.  I thought that i could somehow unlock that function in my camera using CHDK, since i have used a button before to activate the shutter.  But it turned out that it wouldn't work. 

    I needed to use a Canon camera with remote parameters enabled.  That meant i had to either buy an expensive DSLR camera for $600 or do what i ended up doing.  I noticed on the list of available cameras for PSRemote that there were lots of old Canon cameras that had that remote shutter option.  For some reason old entry level Canon cameras had this, but new camera's don't.  I looked at prices and specifications and decided on trying to buy a Caonon SX100 IS.  I ended up getting one for just $30 on Craigslist, it was practically new, the lady still had the box and everything that came with it.

    Now i had everything i needed and could start building the photo booth.  Here's what i originally bought:
    • 14 - 3/4" PVC pipes which come in lengths of 10' ($2.20 each)
    • 12 - 90 degree elbows (a pack of 10 is something like $3)
    • 20 - "T" connections (same thing a pack of 10 is $3)
     how to make a photo booth, pvc, diy, wedding photo

    Here's what it looked like after i cut all the pipes to length and realized that i needed more connectors.  I bought some more T-pieces and a few 4-way connectors. 
     diy photo booth, wedding, fun, how to make, build, program, camera

    This is what it looked like when i first put it all together in the living room.  It was a lot bigger then i pictured in my head.
    wedding photo booth, pvc, build, plans, make, diy, easy

    The basic dimensions of the "room" are 6' high, 5' long and 5' wide.  Actually it's larger then that.  The pipes that i cut for height and width were 6', 5' and 5' but you have to remember the connectors themselves.  That makes the actual height around 6'3" and the width close to 5'6".  That's the type of stuff you forget when you are drawing it on paper, that the connectors add 1.5" or 3" each time you use them.  I made that mistake about 4 times and only realized it when the pipes didn't line up.

    Here are all the little pieces of pipe i had to cut.  I ended up getting rid of these because they were too short and didn't fit tightly enough, but it gives you the basic idea. The connector pieces i actually used were 1.5" long.
    pvc connecter pieces, 90 degree, T joints

    You might be thinking, "why use a 90 degree elbow and a T-joint instead of a 3-way corner."  I had to build it this way because the Lowes and Home Depot by my house didn't have 3-way connectors.  So i had to use two pieces to instead.  It's not that big of a deal price wise these two pieces cost about the same as one 3-way piece that i saw online.

    These pictures below were actually taken before i even bought the PVC.  I did this to test all of the dimensions. You can see the Canon SX110 on the mini tripod.
    photo booth camera, light, lighting, how to, mount, setup

    I measured and tried every combination of camera height and lighting position.  I realized that having bright lights in the right position is very important and can really improve the quality of picture. The final height of the lights and camera was just above eye level.  But i thought the pictures looked the best if the people were looking slightly upwards.

    The lights themselves are ordinary work lights that my grandma got me, i use all the time on different project in the basement and garage.  You can't really see from the picture but i did cut out a piece of semi opaque plastic as a cover, which also made the lights dimmer. 
    lighting, photo booth measurements, height, high, width, wide

    You can also see the measuring tape on the floor, which i used to measure how far away people should be standing from the camera.  Here's what i mean, this is me at 5', 4' and 3' away.
    photo booth distance, measure, how to, test, away

    I decided that the distance from the camera depends on how many people are in the photo booth.  If it's just 2 people getting their picture taken then they can be close to the camera.  But if it's 3 or more people then they need to be farther away.  I am going to have to put marks on the floor to show how far back people should stand.

    The next step was to make the button that people would push to start the series of pictures.  Later on i will describe how the program works but basically you start the program, it does a count down, takes 4 pictures then prints them out.  Everything is automatic, someone just needs to press the button for it all to begin.  

    I could have set it up so that the laptop was open and the person would press Enter or maybe the Spacebar to start.  But to keep people away from the computer and possibly messing it up, i decided that making a Start Button would be better.  There's lots of ways that i could have made a button, but the easiest way is to use an old mouse and an arcade button.

    Step 1 is to take apart an old mouse. 
    disassemble mouse, usb, optical, windows, photo booth arcade button, hack

    Basically you are wiring the big arcade button to one of the tiny buttons on the mouse.  This mouse actually had several buttons, left click, right click, 2 side buttons and the click wheel.  I only needed one, the left click, which is the small white rectangle on the bottom right side of the picture.
    inside a windows mouse, optical mouse, mini button, how to, hack, arcade button, wire

    Here is the circuit board with the two wires coming from the left click button.  I soldered the wires but then used glue as well to make sure that they didn't pull off.  You can see the bottom of the red arcade button and how the wires attach to that as well.
    photo booth button, arcade button, wire, how to make

    This is what it looked like after i shoved everything inside.  You can see the cutout i made for the cable so that it all sits flat.
    make a wedding photo booth button, wire, arcade, red, start button,

    And here's the final product.  The bottom is a piece of 3" PVC pipe i cut, which you can see from the picture above, held all the electronic stuff.  I also needed that because of the height of the arcade button.
    how to make an arcade button USB, old mouse, wire, photo booth

    I bought the red arcade button online for around $2.  There are lots of sites which sell them, but i found out that they are not all made the same.  I originally bought just one red button from AllElectronics.com and really liked it.  It had a smooth clicking action and rounded top.  But then i saw another site that had them for $1 each, so i bought 4 more.  The new ones were a little more cheaply made, but it's not that big of a deal.

    Here's why i bought the other buttons.  I was going to give the people choices.  The green button would be for Color Photos, the yellow button would be if they wanted them printed in Black and White, red for Sepia and blue for some other funny effect. 
    4 button arcade, USB, mouse, windows, photo booth

    But i decided that giving people options is bad.  So i went back to the 1-button version.

    I'm still a long way from putting everything together and finishing the photo booth.  It will probably take me at least another month or two with all all the other wedding projects we have going on.  So i will have to write a Wedding Photo Booth Part 2 when i finally get it all done.

    In Part 2 i plan on showing:
    • curtains
    • brackets for the camera and button
    • shelf layout for the monitor, laptop and printer
    • AC power supply for the camera
    • props
    • video of the photo taking and printing process 

    EDIT:    PART 2
    Wedding Photo Booth

    1/11/2013

    Pontiac Wheel Bearings

    Last month, before driving 1,000 miles to Tennessee and back for New Years, i took my car in to have it looked over.  The nice thing was that i took it to a shop where we have all of our work vehicles fixed, so they looked it over and took a test drive for free.  I had just started to notice a faint bumping noise when i made turns to the right and they confirmed that one of the wheel bearings was going bad. When i looked online i saw prices of wheel bearings for my 2005 Pontiac Grand Prix GTP ranging between $40 and $200.  I wasn't sure exactly what i needed or why there was that huge difference in price.

    Luckily Teresa at work said that Mike had just replaced the wheel bearings on a friends car a few weeks ago.  He even had the large 32mm socket that i needed to get the nut off.  He said he ordered his wheel bearings through eBay from a company called Detroit Axle.  Also everyone that i spoke to about the job said that i might as well replace both sides.  Once one side goes bad, that usually means that the other side isn't too far behind.  So i ordered 2 for a total of something like $70.  The parts arrived two days after i ordered them, since they were shipped from Detroit.

    Thankfully Mike said he'd help me so i went over there one weekend morning.  He also suggested that we put on new brake pads since we would be right there and having to move the brakes to get at the bearings.  I checked SlickDeals and saw that Advance Auto Parts had a deal where if you spend something like $50 you get $15 off.  So i got a nice set of brake pads which only cost $35, rather then the crummy ones you get at a shop.

    We took off the wheels and the break calipers, then removed the brake disc to expose the wheel bearing.  That's when we realized that the 32mm socket wouldn't fit the nut on my car.  We measured and the Pontiac Grand Prix ended up needing a 34mm socket instead.  So we took a quick drive up to AutoZone.  The cool thing is that you give them a $20 deposit and you can rent some of their tools.  Then when you're done you bring back the tool and you get all your money back.  I guess they figure that while you're there you'll buy parts.  So here is the impact wrench with the 34mm socket attached.
    craftsman impact wrench, air tool, socket, big, pontiac grand prix wheel bearing nut, size 34mm

    After we got the nuts off both sides it took some pounding to remove the wheel bearings.  The funny part was that after we removed them, the side that was supposedly good, actually looked worse then the side that was bad.  Here's a picture of the old and new parts.  From left to right is the old brake pads, the new pads, the new wheel bearing and then one of the old wheel bearings on the right side. 
    how to replace brake pads and wheel bearing on pontiac grand prix, 2005 pontiac grand prix gtp

    You can see that the inner housing actually came off of the old bearing.  This was pretty common from all of the Youtube video's i watched.  It seemed like in half of them they had this problem.

    Here's Mike putting one of the new wheel bearings back on, just past the half way point of the process.  
    replace wheel bearing on GM pontiac grand prix, GTP 2004, 2005, brake

    Probably the toughest part of the whole job was removing the three bolts which attach to the back wheel bearing.  The hard part is that they are always rusted, torqued on pretty hard and on the back side of the wheel.  Luckily we got them all off, but that took the most time.  

    Then i remembered from replacing the rear struts on the Grand Prix, that it's always a good idea to use a wire brush and WD-40 on the rusted bolts when putting them back on.  Although these bolts were a lot thicker and less likely to snap then the ones that John and i had to deal with last year.

    I brought over some of my tools and lights just in case we needed them.  The lights are always good to help you see what you are doing.  It's bad enough when you are bending over trying to remove an old rusted bolt from an awkward angle, it's even worse when you can't see the parts.  Here's the new wheel bearing on the car with the 3 bolts and large nut screwed into place.
    install wheel bearing, gm car, pontiac, grand prix, socket size, nut size, brake disc

    After this we just attached the disc brake, then the caliper with the new brake pads installed in them, then put the wheels on.  

    We started around 9AM and were done before noon, that included the trip to AutoZone and back.  It definitely helped that Mike knew what he was doing, i'm not sure if i could have done this on my own.  Maybe i could have, but it most certainly would have taken me more then 3 hours.

    1/08/2013

    All You Need to Paint Like Bob Ross

    According to all the Bob Ross shows i've ever watched on PBS, all i need to paint some awesome mountains and happy little trees are this and a metal putty knife.

    The big old 2" brush that i saw in a store the other day.
    bob ross painting brush, big brush, joy of painting, how to

    Obviously i would also need the paint, Titanium White and a little Vandyke Brown.
    bob ross, afro, fro, hair, joy of painting, brush, how to paint


    1/07/2013

    Las Vegas Wedding

    Back in December Karrie and I flew to Las Vegas because her cousin EJ was getting married.  We flew there on Spirit Airlines, later we vowed never to fly on Spirit again if we could help it.  They charged fees for everything, checked bags, carry-on bags and to pick our seats.

    We stayed in the Hard Rock Hotel which on the map looked like it was just off the main strip.  It really wasn't and let me just say, it isn't walking distance either.  The free shuttle stops for the night around 8PM so our walk to the strip at 9PM took about 40 minutes.  This is the view of the strip from the Hard Rock parking garage. 
    panorama, las vegas, hotel, casino, strip, downtown

    EJ and Heidi got married at one of the chapels between the strip and Freemont strip.  It was close to the space needle and also near where the show Pawn Stars is filmed.
    las vegas wedding, little white chapel, how to, where to go

    Afterwords we all walked around town.  This was when we were walking around the Freemont Street.  It was really cool there, everything was lit up.
    wedding in vegas, binions, freemont street, white dress

    Here's Heidi spinning the big wheel.  Unfortunately i didn't win $1000 like last year.  But we all had fun.
    free spin of the big wheel, slot machine, las vegas hotel, golden nugget

    The last night we were back on the strip walking around.  First we went to see the Pirate show at Treasure Island.  Unfortunately it was closed for repairs for the month of December.  So we headed south and saw the fire breathing volcano in front of the Mirage.  Then we hurried down to the Bellagio to see the fountain.


    This was Karrie sitting on the wall waiting for the fountain to start.
    Bellagio fountain, belagio, balagio hotel casino, when, time

    It was pretty cool but it didn't seem to last as long as normal, they were playing Christmas music too.
    what time is the fountain show at the bellagio hotel casino las vegas

    After the fountain we went drove to the airport and flew home.
    bellagio fountain every 15 minutes, water fountain, las vegas

    It was fun but a little cold at night.  It was around 45 or 50 degrees there in December.  It would have been a lot better if it were sunny and 80 degrees.

    1/04/2013

    Meteor Shower

    A couple of weeks ago there was a meteor shower where i live.  Actually it was two small meteor showers which overlapped for a night.  I've taken some pictures of the night sky before with my Canon camera and the CHDK software.  
    Using CHDK i usually set the exposure time between 24 and 40 seconds.  Then i run the intervalometer script which repeatedly takes pictures over several hours.  The good news is that i saw a few meteors.  This picture is probably the best one.  Now this is a compressed photo about 20% of the size and quality of the original.  But you can still see the meteor breaking up as little flecks of light are all around the white line.
    meteor shower, unites states, streak, light, chdk, canon camera, how to

    The bad news is that where i live i don't see a ton of stars.  If i lived in a more rural area i'm sure i would have seen a bunch more meteors.  The other things i had going against me was where to get a clear view of the sky and the fact that it was really cold in December.  I killed two birds with one stone there, i put the camera on a tripod and set it on top of my garage.  That way i could get a view of the sky without any tree interference and also i could stay warm by operating the camera out of the upstairs window.

    Here's a combination of all the photos i took that night.  The rotating lines you see aren't meteors, they are are the stars rotating in the sky.  You could almost see the north star which would be in the bottom right corner, but the roof blocks it.
    how to photograph star sky, meteor shower, camera, tripod, stars

    And here's the video created from those pictures.  Although i forgot to "up" the contrast before i created the video, it looked better on my computer at home but now that i see it on Youtube it looks very washed out and the stars aren't very visible.