The reason i needed to replace one of the rear hubs on my Pontiac
Grand Prix was because of a mistake i made weeks before. While replacing my rear struts for the second time i accidentally hit the
plastic ABS sensor with the 3lb hammer.
Here's the entire process of installing the new hub. But continue reading for more in depth description and pictures. Install Rear Hub - GM - Pontiac Grand Prix http://youtu.be/Vw8moyoUSb4 The struts are held onto the car with a couple of big bolts. And in order to set them in place i needed to use the big hammer. On one of the swings i missed and hit the back of the hub. For some cars it wouldn't be a big deal. But on my car i have a plastic ABS sensor which measures the rotation of the wheel. So even though i didn't mess up the ABS break itself, just one of the 4 sensors, it still caused an ABS warning light to appear on the dashboard. It's annoying that if just 1 part of the whole process is broken, the whole thing doesn't work. That's like saying if the 'Q' button on the keyboard is stuck, the entire computer won't work. A few years ago i replaced the front hubs/wheel bearings on the car, with the help of my friend Mike. I bought the hubs from Rock Auto via Ebay. This time i compared a few other sellers. The first thing i did is use my favorite trick for auto parts, checked Advanced Auto Parts. They are usually more expensive but online there are always coupon codes that you can use to get $10 or $20 off when you spend at least $50. Next i checked Rock Auto for their price. And the last place i checked was Ebay. It turned out that the best deal i got, on a part that looked to be well made was from Detroit Axle via Ebay. The part looked good, had the ABS sensor attached, was less expensive then the others, and it was from nearby Detroit.
It arrived in the mail a couple days later and i went about putting it on the car. This was one of the first jobs that i also got to use my new tool cabinet. It was nice not having to run up and down the stairs after tools i needed in the garage. Here was everything set out that i thought i needed.
The first step was to remove the tire, break caliper and disc. Then i had to remove the 4 bolts which held the hub in place. I sprayed WD-40 and Liquid Wrench over the 4 bolts and gave it time to try and soak into the threads. Also i tried a trick that i learned from working on the motorcycle, tapping on the top of the bolt head. Just adding small taps will help to try and loosen threads that had been fused together for almost a decade.
To access the bolts there are 2 holes drilled into the hub. This allows you to insert a socket wrench with an extension. So i tried loosening the bolts with a socket wrench. I had to put a metal pipe over the handle to give me a bit more leverage. But i eventually got all 4 bolts loosened and removed. However that did not mean that the hub could be removed. It is still set firmly in place because the round hub was rusted/fused/corroded in place inside of the fitting. I'm not exactly sure what the name of that part is, the swing arm or the knuckle.
It took me about 20 minutes of hammering with a large hammer to remove the hub. I hit it from every angle, hit it with a wood block, hit it while pulling on the front. I eventually saw some movement from the swing arm, and a few minutes after that the hub was removed. I could actually see the broken ABS sensor.
Before i put the new hub in, i decided that i should test to see if it will fix the problem. So i connected the wire to the back of the new ABS sensor. When i started the car the warning light went away and i knew that it would fix the problem. To fit the new hub back in place i first needed to remove the corrosion. So i used sandpaper and a wire brush. Lots of white powder came down
while i was scraping. Even after the sanding and scraping the hub didn't seat easily. To get it to fully set in place i had to gradually tighten the 4 bolts down, sort of in the same way as you would tighten down lug nuts. My goal was to get the hub to tighten flush with the swing arm socket. If it wasn't straight, the wheel would be out of alignment. But after i felt that the hub was tight, i reinstalled the disc and caliper. Then rebolted on the wheel. Everything seemed to be working fine. Then a couple of things happened. The first unrelated thing was that my front tire popped, not the tire on the rim i just replaced. I had hit a pothole back in February and my tire rim was bent. Because it was an aluminum rim there wasn't anything that anyone could do. If it were a steel rim it could be bent back into place. But the car still rode fine, for 6 months at least. This is a picture of that same rim, when i hit a pot hole a couple of years ago. Apparently in Michigan your right front tire (closest to the curb) takes a lot of abuse from pot holes.
When i took the flat tire off i was surprised to see that it wasn't a puncture, but rather the top-inside edge of the wheel was worn completely down to the steel. It was probably a combination of riding with a slightly flat tire and because of the dent in the rim. I'll have to publish another post about finding a new rim and tire and rotating the tires. But also i have to mention that i did need to take the car to get an alignment. I looked into doing it myself but it was too complicated. The fronts were ok but the rear tires needed some minor adjustment, probably from the two times i replaced my rear struts. For now though, it's riding fine and will hopefully go last a while before something else going wrong.
I wanted to make a quick post about what I've learned from installing baseboard. Over the past few years we've put a baseboard in a few rooms and for me it's gone from a pain to do, to something I really enjoy. Putting new baseboard in the baby room remodel was the finishing touch that made the room look really nice.
Here's a video i made of installing baseboard, from the baby room remodel. Easy Baseboard Install - How To
http://youtu.be/UhKeSQPPl4M Let me start by saying, having the right tools makes all the difference in the world.
When I first installed base board years ago I had to use a hand to miter saw and hammer. The cuts with that old miter saw weren't great and it was a slow process having to use a hammer and nails. Also one miss with a hammer meant a dent in the baseboard which needed spackling. Here's some previous posts i did where i talk about the tools i use:
In the past year i have now become the owner of Bostitch nail guns, an air compressor and a DeWalt miter saw. Having a nice miter saw, which makes precise cut,s makes it so much easier to be accurate. I can easily turn the blade of the saw to exactly 45° and in one second make a perfectly straight cut. When it comes to attaching the boards to the wall, the nail gun takes just a few seconds and several nails are through the board. Here's what that baby room looked like before the baseboard. It still needed that finishing touch. So i set up the compressor, the light weight air hose, and the 18 gauge nail gun with 1 1/4" nails.
Getting ready to attach the baseboard.
A month ago we decided to paint the wood door frame around our entryway. Ever since we bought the house the entrance was unfinished wood and it never occurred to me that it would look better if it were all white. I don't know why it took us so long to paint it. It's one of those things that after you do it you ask yourself, why didn't I do that years ago.
After painting the door frame and window frame it was time to install the baseboard. Here's the half-inch round over baseboard which was installed already. It didn't look really great and didn't match anything else in the hallway.
Here's what the rest of the hallway looked like. My dad and I installed this wood floor a few years ago and it still looks great. Back then I just put the same trim back on the wall. I never really liked it but I didn't have time to put up new baseboard.
So the first step was to remove that old trim without damaging the floor. Like before when I removed the existing baseboard in the baby room
The tools i used were a hammer, 2 screwdrivers, and a crowbar. It pulled off pretty easily since I wasn't too concerned about damaging the trim itself. Here is what the wall and floor looked like after I got all of old trim removed.
I usually like to start measuring at an existing piece of vertical door frame. That way I know I can measure to a flush surface and don't have to worry about two 45° angle cuts. You can see from this picture below at the edge of the closet the left side is a 90° cut and the right side is 45°.
The easiest way I've learned install baseboard is to measure and mark the inside of the angle. By that I mean I measure the wall and the distance is where the back part of the board will line up. For example that same corner, the face of the board will actually be longer because the board is angled out but the distance I measure the wall is the same distance at the back of the board. Once you cut that angle at 45°, you then have to swing your saw to the other 45° angle to make the next cut. Again like I've learned from the family room remodel and the baby room remodel, none of the corners in our house are 90°. You can see from the previous picture that there are some gaps in the corners. That's where spackling comes in to fill that 1/8th inch or 16th inch gap. Also you have to use spackle to fill in the depressions made from the nail heads.
Then the final touch is to caulk the top seam. Otherwise it looks crummy with that gap on the top.
Overall though the new white baseboard makes the hallway looked brighter and newer. Such a quick and easy upgrade makes the hallway looked totally different.
We have recently become the new owners of a Chrysler town and country. We bought a 2007 with 85,000 miles. We are really happy with the minivan it drives well and is in great shape. Also we really like the flip down seats and all the space available in the back. I really like the fact that a 4 x 8 sheet of plywood fits perfectly.
There were 3 problems though after we purchase the van which needed to be fixed. And after reading online about the Town and Country we realize that both problems are very common. I also learned that both the Chrysler Town and Country and Dodge Caravan are the exact same vehicle. I think they are made in the same factory and then they just replace different panels and slap a different logo badge on the hood. But all the parts and inner workings of the minivan are the exact same part. So everything i describe below is exactly the same whether you have a Town and Country or a Caravan.
Here's a video i made showing the three problems and how to fix them. But for more details and additional pictures, continue reading.
Chrysler Town & Country - 3 Common Problems and How to Fix
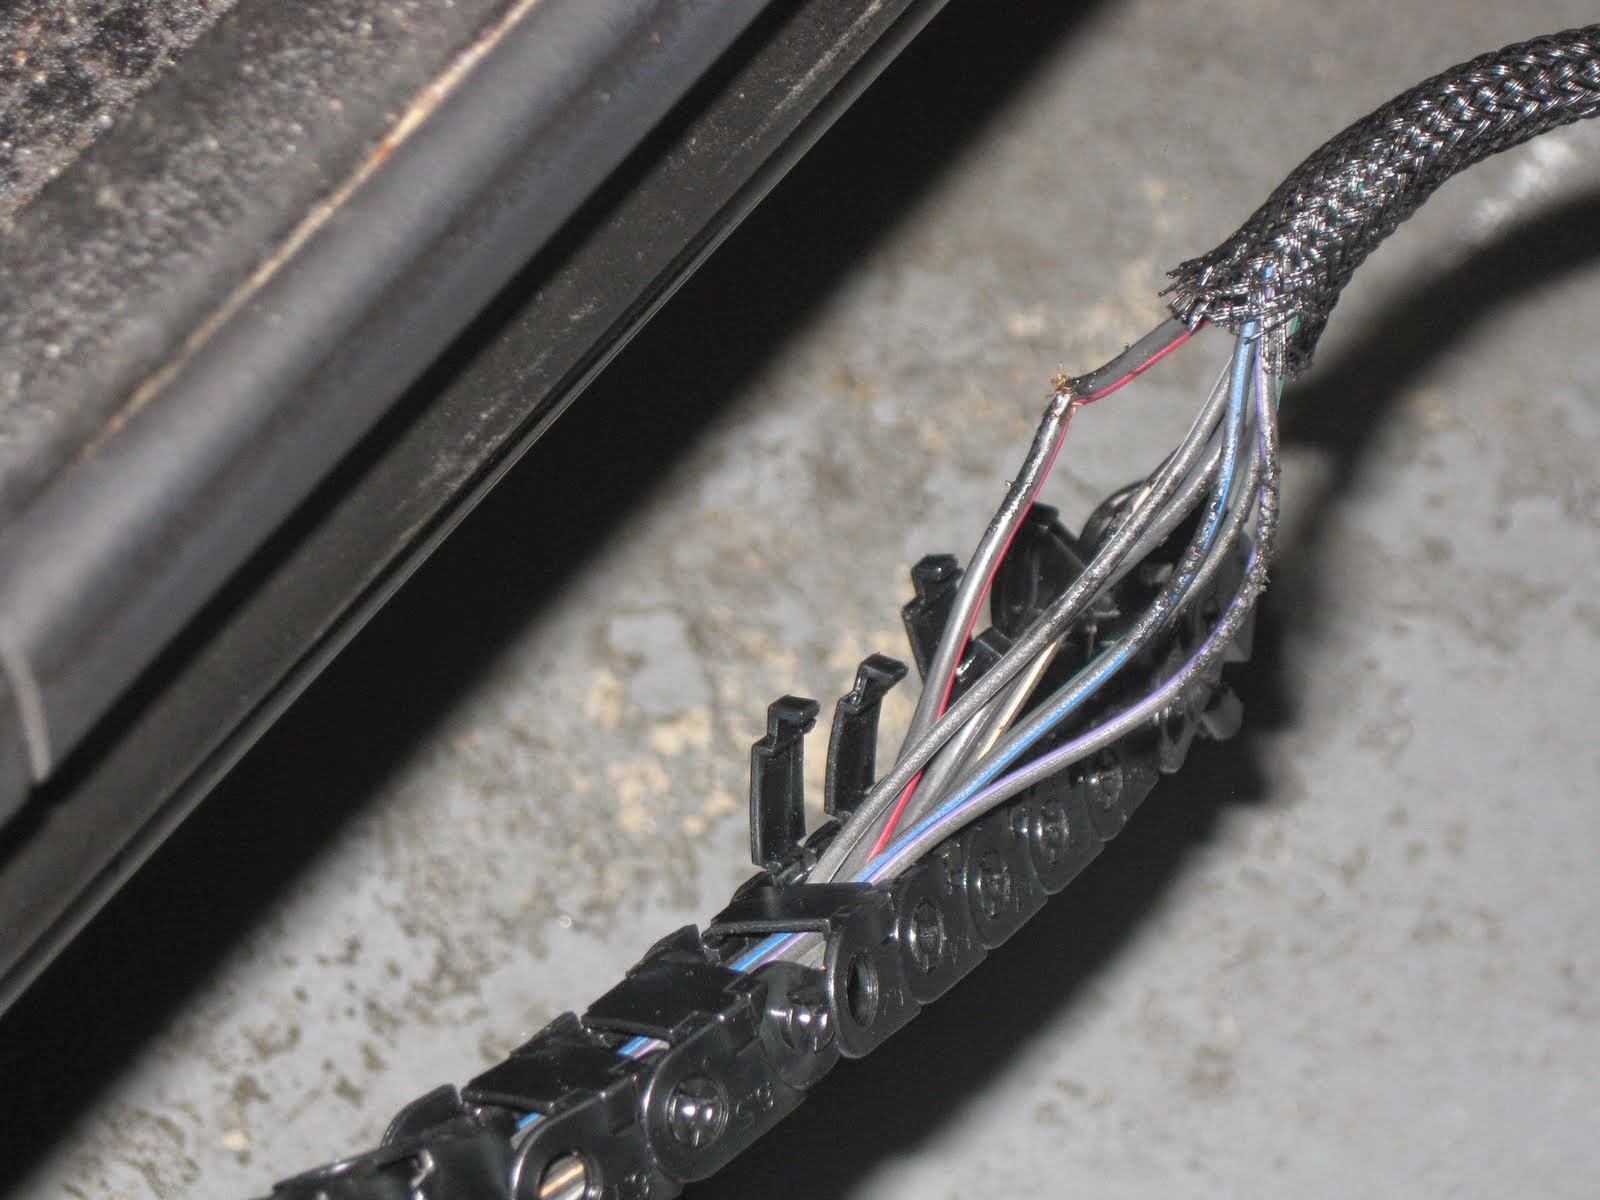
http://youtu.be/Hx4DhTAjrdY Problem 1 The first problem we had was with one of the sliding doors. The electric push button didn't work. Some people said they experienced problems where the sliding door would go part way, stop, and reverse. Other people had the same problem we did, where the door wouldn't move at all when you pressed the button. It didn't matter if you pressed the button on the remote or on the dashboard, the door would not move. We could hear the auto door locks engage and disengage when the button was pressed, but there is no sound or movement from the door or sliding door motor. We knew it wasn't with the remote, relay, fuse, or switch since the passenger side door opened and operated just fine. (as long as it was unlocked...see problem 3) So after reading some more we determined that it could be a few possible causes. Some people said they needed to replace inner motors or switches inside the door panel. But by far the most popular cause for the door not working was a broken wire. With the sliding doors there is a bundle of wires which run in a plastic chain at the bottom of the door. It's a crummy design where all of these wires coil and on coil as the doors open and shut. It seems to go bad for most people between 50,000 and 70,000 miles. For us it was the driver side door which didn't work, I guess that means in a few years the same problem will happen with the passenger side door.
You can see from the diagram how the plastic chain coils up as the door closes.
I forgot to take a picture of the actual break in wire, but here's another person who had the same problem. Luckily they only had to remove a few links of the plastic chain to find the break.
The fix is to crack open part of that plastic chain and look in the bundle of about 10 wires for the break. The first time I tried looking for the broken wire I didn't find one. I only opened about five or six links of the chain and didn't see anything. But after reading more about it I knew that one of those wires had to be broken inside. And sure enough after I removed every link of the plastic chain I noticed one large wire which appeared to be solid, but as it was bent there was a clear break in the copper wire. So I used electrical pliers and stripped the casing off the wire. Here's what it looked like after i removed casing on both sides of the break.
Next I slid on plastic shrink wrap tubing which would protect the fix after I was done. I usually forget this step and have to wrap it in electrical tape.
I then got out my spool of solder, flux and soldering iron. I used an old piece of concrete board to protect the other wires and give me easy access to where I would be working. Remembering to coat the wires in flux, i then soldered the two wires together. It wasn't pretty but it held together well.
Now at this point since I remembered to put on that heat shrink tubing before I began I was able to slide the tubing over the damaged area and used a lighter to seal everything up. Very professional looking.
Here's what those heat shrink wrap tubes look like. For electrical connections that might get water into them, they are great.
I did realize that this 'rigid' point in the wiring could be a perfect place for it to break again. It's possible that in a few years it will snap at the exact same point and I would have do the same repair. But it's much easier and cheaper than some people who replaced the entire wire harness. The funny thing is that Karrie's father has the exact same van and had the exact same problem with the sliding door. One day when he was over I found the break in a completely different wire, soldered it together, and fixed theirs in about 10 minutes. Problem 2 The next problem we had with our Chrysler Town and Country was with the interior dome light. There's two lights right above the driver and passenger seats. Neither of those two lights worked, even when we pressed the switch. For this it could've been a fuse, but I looked in the owners manual and checked the fuse box and everything seemed to be fine. Also there wasn't a specific use for that overhead dome light and nothing else in the car was out. If it was the fuse not only would the overhead light have been out also the radio and some switches on the dashboard. So we watched a video on how to remove the clear plastic cover plates. They said to use a plastic shim and pop the plastic cover plates from the front not the rear. At the rear there is a plastic tab which is where the cover rotates. I got this little plastic shim tool several years ago and i've used it tons of times when working on the car. It's rigid enough that you can use it as a prying tool, but it doesn't leave a mark and damage anything. I use it later in 'Problem 3' to remove the door panel, but it was also the right tool for the job of removing the dome light cover.
Once we remove the cover we pulled the light bulb down and noticed that they were burned out. It was a bit tricky when we went to try and buy these light bulbs. None of the auto parts stores had them in stock. Even when Karrie went to the dealership they didn't even have them on file. But luckily the guy noticed them on a shelf in back, he had 2 left. We looked online and Amazon did have them for five dollars each, but it doesn't sound like a very popular part, even though they're in thousands of Chrysler and Dodge minivans. It seems strange. The part was Phillips 3M PC579.
It was a little tricky to install the light bulb. On the sides there is a plastic wedge that needs to lock into place. I found that it takes quite a bit of force to push and turn the light bulb before it actually locks to where it should be. I was almost twisting to the point where I thought it would break the plastic before it settled into its correct location. You will hear a snap, or click when it locks. The other funny thing is that Karrie's father also had this same problem too. However his light bulbs were not burned out they were just loose in their connection. I poped the cover plate off and noticed that they were loose in the socket. I had to really twist before the light bulbs snapped into place. Another bad design and common problem for the van. Problem 3 The last problem we had is another common problem with the Chrysler Town and Country, and also the Dodge Caravan, the automatic door lock. It's technically called the door lock actuator. Specifically it's the "motor" which moves the locking mechanism up and down. We didn't realize it until after we owned the van for a month, but the lock on the passenger side sliding door didn't work. It didn't matter if we pressed the button on the remote or on the door. All of the other doors would lock and unlock, but that door did nothing. A big problem with that is you think the doors are all locked but someone could just come up and open the door. Also if you manually press the lock button, then press the button to open the sliding door, nothing happens. You have to manually lift the lock button for the sliding door motor to work. I probably should have gotten out the multimeter and checked the fuse, relay, wiring, etc. But after reading how common it is for the actuator to break, i figured that it was the broken part. The bad thing was that the actuator was $50-$60. Fortunately Karrie had a 35% off coupon for Advanced Auto Parts, so she ordered the actuator. Normally it was $60 but she picked it up for just under $40. Here's what it looks like. The white plastic piece is something you have to switch depending on whether you are replacing the drivers side or passenger side door.
To figure out how to actually do the repair i did what i normally do, i looked for a video on Youtube. There was only one where the guy replaced the actuator, and it was only on the driver side sliding door. It looked pretty simple, remove the door panel, unscrew the actuator, install the new one, put the panel back on. So one afternoon i started working. I removed the door panel with my little plastic panel tool. The same one i used to pop off the dome light cover. I told you it's really useful.
The panel and trim piece came off fairly easily. Although i always think that i'm going to break the plastic when i'm doing it. Here's what the door looked like at that point.
The actuator was located at the rear of the door, it had lots of cables and wires going to it. It's kind of covered up in the picture above, but it's on the far right side. Again i tried pressing the lock/unlock to see if maybe something was just jammed. But just like we noticed before, there was no sound or movement. Then i figured, before i go any further, i should connect the new actuator and see if it works. If i connected the new part, pressed the button, and nothing happened, then i would know that it wasn't the actuator that was broken. So i unplugged the wire harness and plugged it into the new actuator. This time when i pressed the lock/unlock the actuator lever moved back and forth. Here you can see the new actuator dangling down, just for testing.
It was good knowing that we were right and it was the actuator that was bad. Now i just had to install the new part and i'd be done. Easy, right? Unfortunately it was more complicated then i originally thought. In the video the guy was able to remove the actuator after he took out 1 screw. There was an access hole in my door panel, but the screw head was not visible. I looked with a flashlight at every side and every angle but could not find the screw to remove. I tried to pull off the old actuator but it was definitely held on somehow. I realized that my only option was to remove the entire metal bracket which held the actuator, cables and door latch. All of those wires and cables go to the metal bracket. I had to remove all that to get to the screw to remove the actuator.
That meant that i had to go out of the van and remove 3 big bolts at the end of the door. This is the point in the job when you are like "I think i'm getting in over my head."
I was a bit nervous removing the entire thing, not sure if i could get it back together. But after i got the whole bracket off i was able to see and get to the small screw holding the actuator in place. I guess they just put the access hole in the wrong spot on this van or something. Here's the old and new actuator.
I put the new actuator on and put in and then the screw. At this point i missed something, but didn't notice it until later. So i reattached the metal bracket and put the door panel back on. Happy with the work i'd done, i wanted to test the lock to see if it worked. So i pressed the button to lock and unlock the door. It sort of worked, but the latch wasn't moving very far. It seemed like it was caught on something. That meant that i had to remove the door panel again and figure out what was wrong. It turned out that there's a metal pin that has to fit inside of a plastic channel. When i slid the actuator into place, i forgot to make sure the pin was in the channel. The gold pin on the left should be inside that oval track. Installing it properly meant that i had to do everything over again.
So i had to remove the entire bracket again, remove the small screw again, reset the actuator with the pin in place, then put it all back together again. This time it worked perfectly. It was a little more work then i thought it would be, but not super hard. Now the door locks and unlocks like new. I'm glad that the 3 main things wrong with the van that we fixed weren't too difficult. So if you know anybody is complaining about either of these three problems you can tell them it's very common quite a fix.

.jpg "fix abs sensor, strut, shock, brake, wheel bearing, hub")


.JPG "dented aluminum rim, fix aluminum rim, flat tire, pothole")


.JPG "easy paint, room upgrade, remodel, home, color")
.JPG "cheap baseboard, cheapest, cost, money")
.JPG "hallway baseboard, easy upgrade")

.JPG "easy base board, how to, cut, miter saw")
.JPG "home baseboard, how to, install, nail, cut")


.JPG "chrysler town and country, common problems, fix")
.JPG "chrysler town and country, sliding door won't work, won't open")
.JPG "chrysler town and country, how to fix sliding door")
.JPG "minivan sliding door won't open, won't work, button")
.JPG "car electrical wire fix, properly, heat shrink tube, solder")
.JPG "electrical heat shrink tube")
.JPG "plastic car trim removal tool")
.JPG "chrysler town and country, dodge caravan, dome light, light bulb, model phillips 3m pc579")


